PS/2 Keyboard for Apple II
Table of Contents
Why?
I was cleaning up my cellar the other day as I found my old Apple II europlus. Since it was the computer I’ve started programming on (not in the 70s, though) I’m a little emotionally attached to that old beast and decided to toy around with it a bit – AFTER cleaning up the cellar of course ;).
Unfortunately most of the keys hardly worked, quite some were completely broken – the age (around 30 years) definitely shows. I tried to fix the keys a few years ago but gave up, since they kept breaking at an incredible rate.
Thus I decided to build a converter that enables me to use a common (and much more comfortable) PC-keyboard.
This is what you’ll need
- Microchip PIC 16F630 or 16F676
- Some means of flashing code onto the PIC (I used JDM’s programmer and WinPic)
- A 6-pin Mini-DIN female (jack) – I unsoldered mine from an old motherboard
- A proper amount of nostalgia
Building it

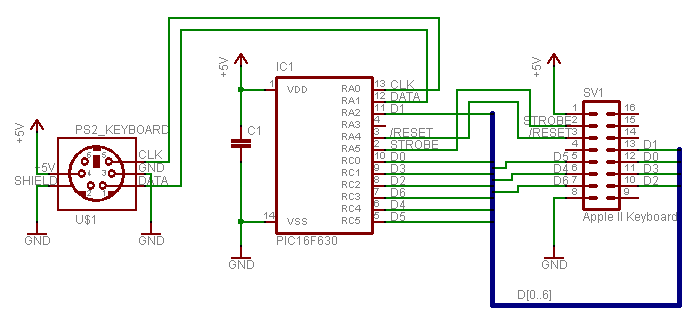
The pin-assignments of the PIC seem a little random, especially the Dx-lines. However, like this it’s possible to piggy-back the PIC (14 pins) on top of the keyboard-socket (16 pins) on the motherboard. It’s not hard to figure out how, here are a few tips:
- Even if it’s obvious: don’t solder everything directly to the keyboard-socket, put another 16-pin IC-socket with pins on both sides inbetween
- Piggy-back in a way so pin 1 of the keyboard-socket and pin 1 of the PIC line up
- GND is at pin 8 of the keyboard-socket – you need to connect it to the PIC’s pin 14
- IMPORTANT: Make sure the keyboard-socket’s pins 14, 15 and 4 aren’t connected with the PIC’s pins 12, 13 and 4, respectively
- Don’t forget the ceramic capacitor
If piggy-backing is too much fiddling for you, you can always put everything on a small board and use the ribbon-cable.
Power is drawn from the Apple via the keyboard-socket (pins 1 and 8 of SV1), so you don’t need any extra wiring for power.
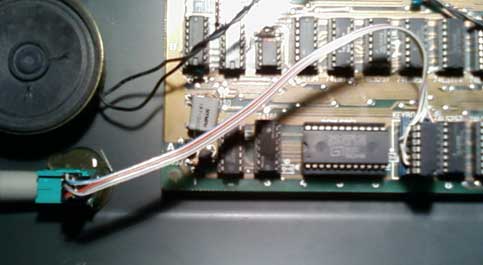
This is how it looks here:

On the right you can see the inserted piggy-back-construction and a ribbon-cable to the PS/2-socket on the left, which I hotglued there.
Using it
After you’ve built and connected everything, turn the power on and push keys on the keyboard; hopefully the keys you push there correspond with those you see on the screen.
Notes:
- On power-up, the LEDs should flicker in a funky way
- Repeat rate is set to 12cps, delay to 0.25 s
- Ctrl+Alt+Delete will assert /RESET (like the RESET-Button on the Apple II-keyboard does)
- The only implemented keyboard-layout is en_US, if you need a different layout (de_DE for example) you’ll have to add it to the code.
- If your Apple has a small caps-modification, you’ll need to adjust the code to make it work.
- All the key-combinations (Ctrl+? and the ESC-stuff) should work as expected. If you find something doesn’t work as it should, let me know.
File(s)
With HI-TECH C >= 9.81, you might need to put
#define _LEGACY_HEADERS
on top of main.c, see this document. Thanks Miles for pointing this out.
Closing words
That’s it already, I hope you’ll waste as much sweet time building it as I did :). As always, I’d be happy to get mail if you built it successfully!
